Love them or hate them, wood knots are a natural feature of the wood we work with. In many cases, they can add a defining feature to your project, but it can be difficult to know how to seal around them to prepare them for painting and prevent issues down the road.
You must properly seal wood knots by applying multiple coats of a shellac-based sealer so that they do not cause issues with the paint or stain. If not properly sealed, wood knots can cause deformation or even pop out of the wood in time.
In this article, we’ll explain how to seal wood knots most effectively, and we’ll go over how wood knots can affect your woodworking pieces. Whether you’re building a simple chair or an art piece, these wood knots should be treated with care to keep your work as perfect as long as possible.
The huge variety of finishes for furniture is one of the subjects we will be diving deeply into during our live online workshops at Cucamonga Woodworking and you can check out our past workshop YouTube videos Here(Link to Cucamonga Woodworking)
How to Seal Wood Knots Before Painting Them
As a quick preface: Please check the directions of the sealer you will be using to ensure you’re applying it correctly. They will give the best details on what to do.
However, sometimes sealers lack detailed instructions. Because of that, we’re offering our general guide that comprehensively details how to seal most woods with most sealers.
Start by Inspecting the Problem Areas
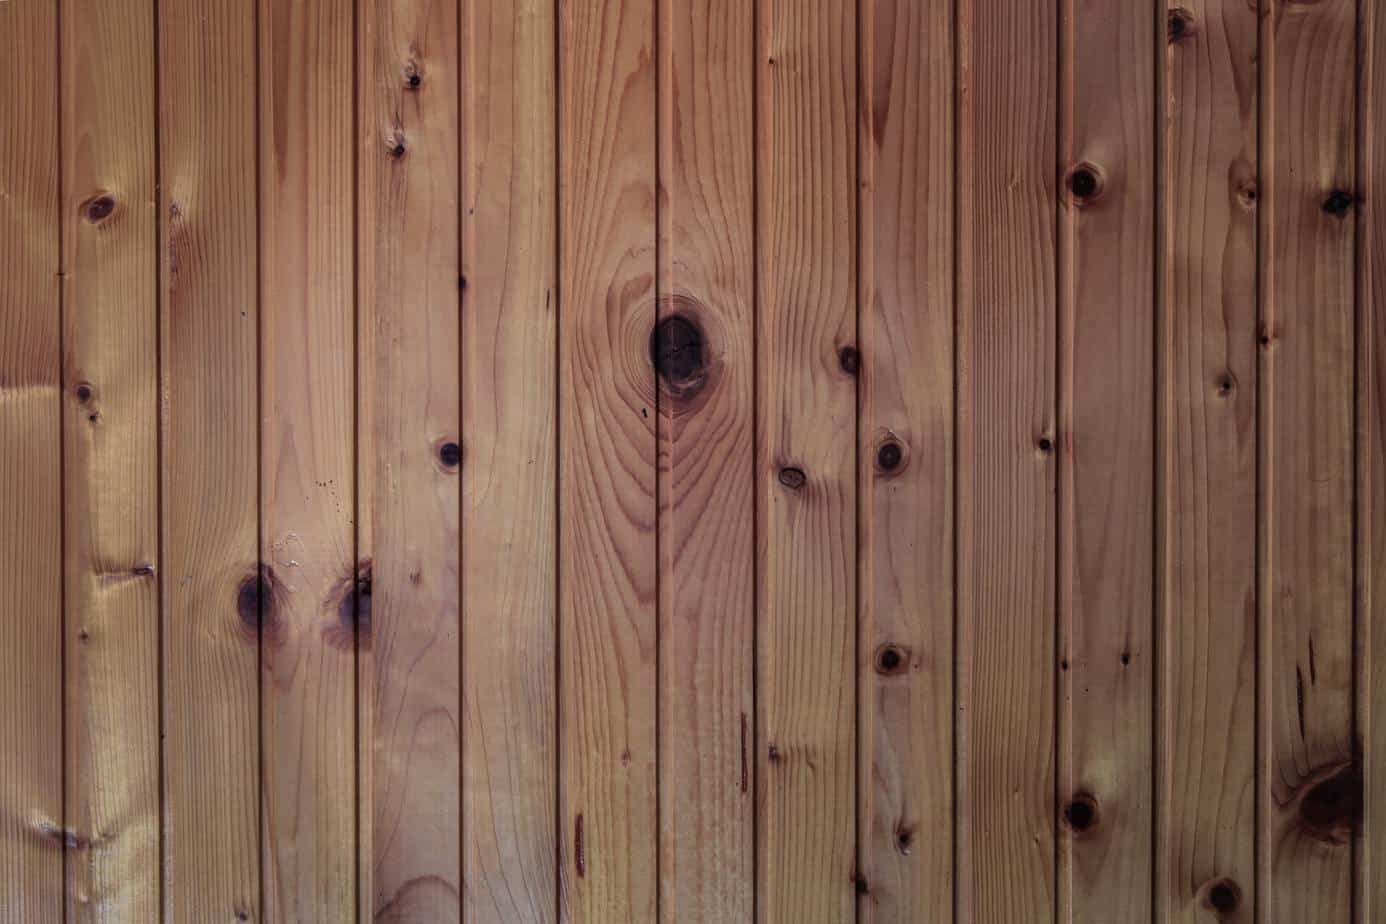
First, inspect your wood for any knots on the surface. They are circular or oblong with different coloring, and often the wood grain flows around them. On softer woods like pine, fir, and spruce, they are really common. Much lower cost lumber will have more knots, like pine.
Knots are often taken into account when grading wood, as knots can cause issues with strength or appearance. The lower the grade of wood, the more knots it tends to have. However, this may not be a big issue if you like the appearance of these knots.
Check the Moisture of the Wood
Wood with high moisture content can create issues with anything adhering to the wood’s surface. If you live in a dry climate or just bought the lumber from a properly ventilated lumber yard, you should be fine.
If this wood was kept in a moist shed or outside, we suggest allowing the wood to dry for at least 48 hours before using it. You may want to purchase a wood moisture measuring device if you often have issues with wet wood.
Check out my article on how dry wood should be for woodworking for additional information(Link Here)
Scrape the Wood and Apply Heat
If you’re working with fresher lumber, the woodgrain is packed with resins and oils that will squeeze from the fibers as the wood ages and dries. With older woods, this has already occurred, and this dried resin needs to be scraped away.
However, if you’re working with fresh wood with strong wood knots, we suggest using a heat gun (or even a blow drier in a pinch). The heat will dry the wood quickly and force it to squeeze out the resin.
When this is finished, scrape away the resin with a tool of your choice. Be careful not to damage or gouge the wood while doing so.
Clean the Surface
This is an optional step. If your wood is sticky or tacky to the touch, use a little turpentine or thinner and a rag to wipe the surface clean of this resin or coating. Any of this coating will make it difficult for the paint or stain to adhere to the surface.
Sand the Wood as Normal
Here we enter into the normal preparation phase. Sand the wood to remove any rough areas or smaller fragments of resin. Focus especially on the wood knot as they tend to shift from their initial cut and might protrude. The knot will be harder and might be sharp, so your sandpaper might take more of a beating.
After the knot is tended to, sand your wood as you wish towards the designs of your project.
Apply the Sealer Properly
Now is the big step. There are various sealers out on the market, and many more combination sealers have a stain or paint as a hybrid product. If you’re worried about knots affecting your workpiece, it’ll be best to choose a standalone sealer. Regardless, choose a sealer best fit for your project.
With your dried and sanded wood, apply the sealer by following the grain of the wood. Pay close attention to the wood knots. Knots have weird wood grain and may soak up more sealer than the rest of the wood.
Wait the recommended amount of time your particular sealer states to wait in the instructions. This is often an hour or more. Then apply an additional coat and repeat the drying process. Apply as many passes of the sealer as you wish, perhaps an extra one or two to the wood knot to be sure.
My article on Shellac have a lot of good additional information:
Finish the Prepared Surface
Finally, once the sealer has penetrated the wood knot and the rest of the wood, you may apply the paint or the finish of your choice. The wood is now prepared and ready for anything you throw at it.
Wood Knot Issues
The reason why wood knots should be sealed is that they are not uniform to the wood’s natural grain. They are imperfections caused by older limbs of the tree being swallowed up by the trunk, encased in the main body. When lumber is made, the knots are present, and thus this specific lumber is graded by how many knots it might have.
These knots can cause many issues. Sometimes, you might see holes in lumber. This may or may not be an issue. This is when wood knots have fallen out, and the same issue can happen when the wood dries, and the loose wood knot releases its resin and finally falls. Sealing the wood and knots keeps them in place.
If the wood knot is secure in the lumber, the release of this resin and oils can cause bleeding into stain or paint. For example, in pine, the wood knots can seep a yellow resin into the stain and ruin the finish. The knots can push against the paint for painted woods and cause a weird bulbous protrusion on the surface.
Once sealed properly, wood knots change little to none at all in the final product. That’s why it’s important to properly treat the wood and ensure the beauty of your final product lasts as long as the rest of the wood does.
Should You Avoid Wood Knots?
Wood knots can cause issues. First, their appearance might be unsightly to many or a defining feature. Most pine lumber has knots that are typical of how the trees grow. They can add a nice twist to the otherwise dull appearance.
The biggest issue with wood knots, love or hate them, is in the wood’s structural strength. Wood knots cause the wood fiber to flex at odd angles and create a dead point in the lumber. If the pressure is applied in the wrong direction, these wood knots can cause the wood to break around the knot.
If you are using lumber with many wood knots, it would be best to use the lumber with many knots in areas where there is less force applied. For example, if you’re building a chair, use this wood for the backing slats rather than the legs or seat. If you’re building larger pieces where some wood is hidden away, such as a dresser, you can use this knotted wood in the back where only a little structure is needed.
Sealing Knots for Painting
Lumber with many wood knots can be tricky to work with, involving a bit more prep and strategy to use. We hope we’ve given you a great guide on sealing these wood knots before painting your next project.
Sources:
https://www.wagnermeters.com/moisture-meters/wood-info/pros-cons-knots-in-wood/
https://homeguides.sfgate.com/seal-pine-knots-99384.html