Creating your first piece of masterwork woodwork will inevitably require that you use the nearest drilling machine to drill a few holes. It may be to have a dowel inserted in the right way or create a guiding hole for your next screw; either way, what you will be faced with is the inevitable quandary about which drill bit to use.
You will need six types of bits for woodworking, starting with the standard, Forstner, countersink, brad point, self-centering, and plug center bits. When you start your journey into woodworking, you will need to get a proper set of standards, brad points, and Forstner bits to ensure you can do everything properly.
These six may not be the only drill bits out there. There are so many unique drill bits that making a list of them is best left to suppliers. With the basic six in your toolbox, you will be able to do so much that you may find yourself wondering why anyone could ever want more unique ones. To make life easier, most common woodwork projects won’t require that you have all six, while other woodworking projects require that you only ever use a standard drill bit.
Here’s everything you need to know about woodworking drill bits!
You would be surprised how often this question comes up. We talk a lot about random topics like this during our live workshops on Cucamonga Woodworking. You can watch our past workshops on YouTube here(Link to Cucamonga Woodworking)
What is the use of the three basic drill bits?
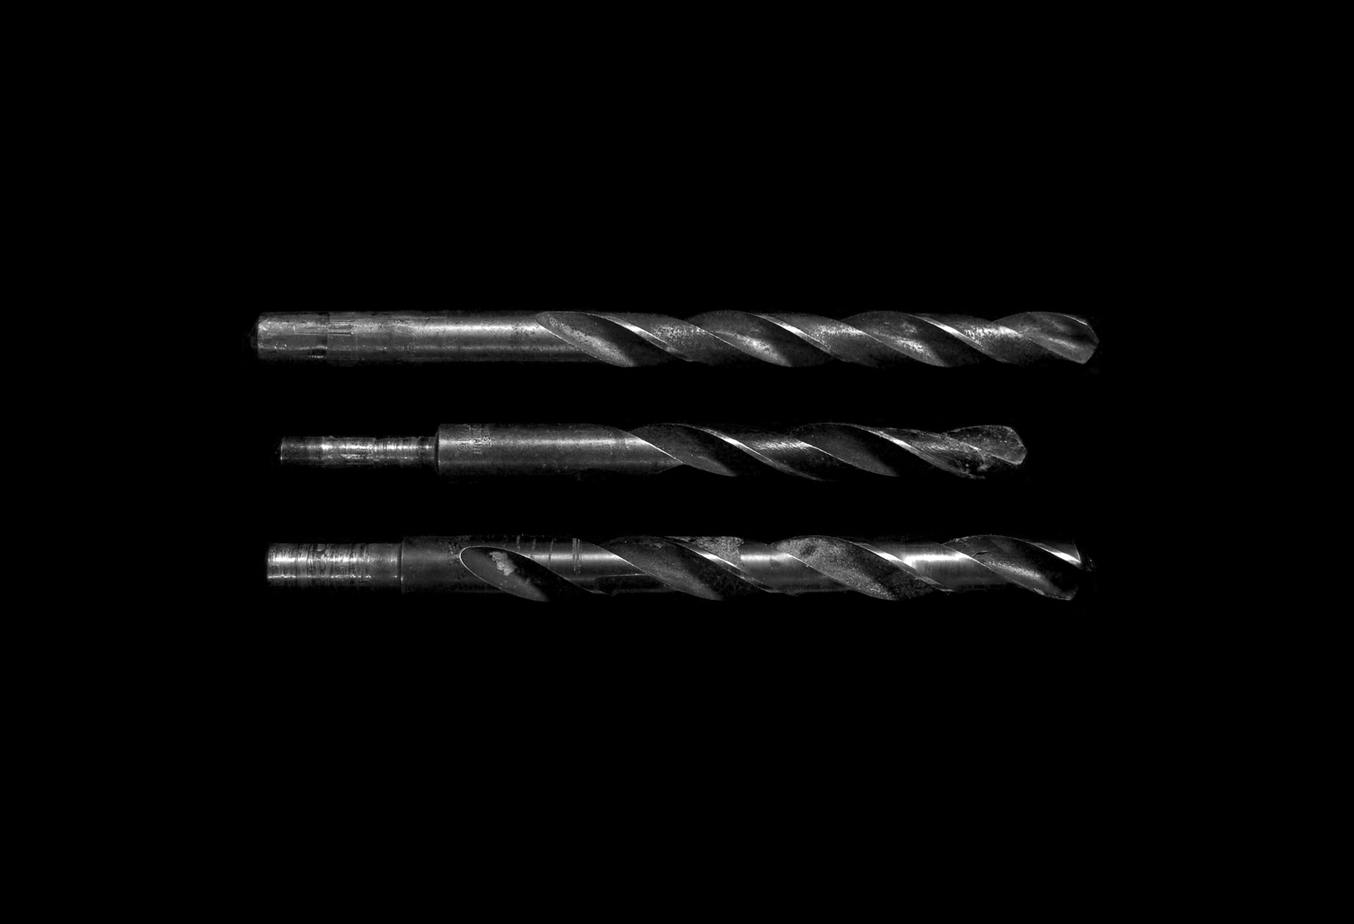
There are three drill bits that you must include in your tool kit from the start; these are the bits that will allow you to make anything from basic shelves to some of the most luxurious woodwork. The standard, Brad Point, and Forstner drill bits will allow you to join, extend, or modify any piece of wood out there.
This includes compressed woods or only plain pine; the trick to using these drill bits is knowing when to use them. Not using the right drill bit will lead to ugly cuts, wood splitting, or the project not aligning correctly despite the right cuts being made.
Standard Drill Bit.
Everyone that thinks of a drill bit will immediately imagine this type of drill. It is the standard in every way of the word. Many people use these to do almost everything they need when making holes; not limited to the woodwork world, the standard drill bit is functionally the most diverse.
Shaped with a slight taper at the end and made from high-speed steel, the standard drill bit has been made for chewing into any piece of wood easily. The standard drill bit that has been made for wood will be significantly sharper than other standard drill bits. Allowing you to drill into almost any piece of wood easily and comfortably without fail.
Standard drill bits are usually used in wood to create guiding holes for either larger drill bits or for screws to go into.
Brad Point
Like the standard drill bit, Brad Point is one of the drill bits that people always think of when imagining a drill bit. However, unlike standard drill bits, these cannot be used without a guiding hole is drilled first.
While you can always drill smaller holes using only Brad Points, it is not recommended, owing to the drill bit not being tapered at all. These drill bits create flat bottomed holes that will usually be used for some fastening within woodwork.
Dowels are the most common but not necessarily required product that Brad Points are used for. Many woodworkers like to use these drill bits to make flat bottom holes in which they can safely put tapped pieces in which bolts or other pieces can be screwed into the wood. Usually, when dowels have to be used with wood, these are what craftsman uses.
Forstner
Sometimes you need a hole; you need perfectly round holes that are large enough to pass through entire plugs or create a large enough hole for a Jigsaw to go through. For many, the Forstner drill bit is used as the last step before applying the final finishing touches to their work.
Forstner drill bits have either sharp tapered bits or can be fitted with standard drills to act as a guide as you drill your large hole in the wood. Forstner bits can be quite hard to use but is also one of the most important parts of your drill bit kit to have. Allowing you to create the necessary holes to route cables and other odd parts through your woodwork.
Forstner bits come in many sizes and can easily bore against the grain, with the grain, and many wood shops will require that you use these bits exclusively on the drill stand. However, there are now many Forstner bits that can be used on a normal handheld drill.
What do the advanced drill bits do?
As time moves on, you will eventually learn that some projects require more than the normal set of drill bits you have in your garage or shop. Getting to more advanced joints means that you will require some refinement or just some odd joins between wood pieces.
Many of these pieces require that you have a bit more refinement when working on the pieces and using some special tools. Either lathe, drill presses, or a larger drilling machine, each of which will expand the abilities of what you can do with wood much more.
Countersink
One of the most underrated drill bits is the countersink, which lets your screws disappear into the piece you are working on without a crack. Used after you have already drilled the hole that your screw will go into, countersink drill bits are usually short and thick tools.
Many woodworkers have several uses for countersinks on any project they may be using, some even using standard drills when they cannot find the right countersink. The purpose of a countersink is to create a recess in the hole that has been drilled, allowing the head of the screw to disappear below the surface or perfectly flush with the wood surface.
When done properly, you can use countersinks to easily create joins that cannot be seen at first glance, allowing you to put a beautiful plug over the hole. This is done to create a more finished look to allow your finished project to look and feel clean.
Self-centering
When you have finally done what felt like the 1-millionth center hole punch on a project to get brackets perfectly aligned, you may find yourself wondering if there is an easier way to do it. The answer comes in the form of a unique looking drill bit called the self-centering drill bit.
This drill bit uses a special jig to be put in the hole of a bracket, and then simply drilling the hole through the jig, the exact center for the bracket’s screw holes will always be bored. A unique tool that saves only a few seconds on most projects saves a lot of time when you work with wood all day.
Backyard woodworkers often won’t use these drill bits because they are too expensive, and the time saved is not worth it. However, if you are creating several larger projects daily, you may find that this simple drill bit is perfect for speeding up your day.
Plug Center
Most of the time, you will buy plugs or dowels from shops when you buy your wood; however, as time moves on and you start working on more and more projects, that can become a problem. The stores may not have enough plugs or dowels for you to use, or they may not match the materials you are using throughout the rest of the project.
Using a drill stand and a plug center bit will allow you to cut your wood plugs or create dowels. This is a simple way for you to create enough plugs for your shop so that you may easily and handily create enough plugs never to run out. The main advantage of this will be that the plugs you are using will be the same material as the wood, which reacts the same as the surrounding wood to stains or glues.
What types of screws do you need to drill holes for?
There are several types of screws that you can use in wood projects, with no nails ever requiring that you predrill a hole. While screws can all turn into the wood piece that you are working on, there are limitations.
If you screw a large screw into any piece of wood, the wood will snap, splinter, or tear apart. This has caused many projects to be started over from scratch as the wood is split entirely lengthwise as new screws are added.
There are predominantly two types of screws used for any woodworking project, self-tapping and normal screws.
Self-tapping screws
Self-tapping screws are loved by all backyard woodworkers and despised by everyone else. These screws work as their little bores, creating a hole in the wood as you screw them in. When done properly, they can be perfectly flush and hold on tightly to the piece you are securing.
However, as amazing as these screws are for quickly fastening something, they are not a good idea for more refined projects. Limited due to their size and the damage they cause to any wood, self-tapping screws usually cannot be removed once inserted.
A few of these in your workshop will be perfect for emergencies or fixing something you need to fix quickly. However, if you will be securing something properly, you will need to use normal screws with guide holes already drilled.
Normal screws
A normal wood screw is usually some brass color and will have a sharp point; however, they can require anything from being countersunk to being broken off once done. However, they all require that some sized hole be drilled before you screw them into your woodworking project.
While many people like using nails for their speed, normal screws have a clear advantage over other fastening ways. If done properly, they can be the last thing to fail on your project, often being the only thing that holds many projects together. Check out my article on gluing vs screws for a joint. (Link Here)
To drill holes for these screws, you usually only require a standard drill that is slightly smaller than the screw itself. Creating a guiding hole allows the screw to bite into the wood and create a seamless joint easily.
How to drill perfectly straight holes
When it comes to using the drill bits, there is one question that even the most talented woodworker will have when they first start, how to get a straight hole that won’t be skew in any way. The answer is complicated, and like almost every piece of a perfectly aligned project on earth, it requires more than just the right tool; it requires practice
Use G-clamps
You cannot use g-clamps on your drill, and you should never hold onto any piece of work that you are actively drilling into.
When drilling into a piece of wood, it is recommended that you always clamp it down in some way, and using this to help you create a perfectly straight hole can be vital.
Just be sure that you are clamping the piece onto something that is perfectly straight.
Use a Wood Lathe
Not always an option, usually for when working on something round, a wood lathe can be used to make perfectly straight holes.
This is because the drill bit will be held perfectly still and straight, creating a perfectly round and straight hole. However, it may be off-center if you have done something wrong, like tightening the piece too much.
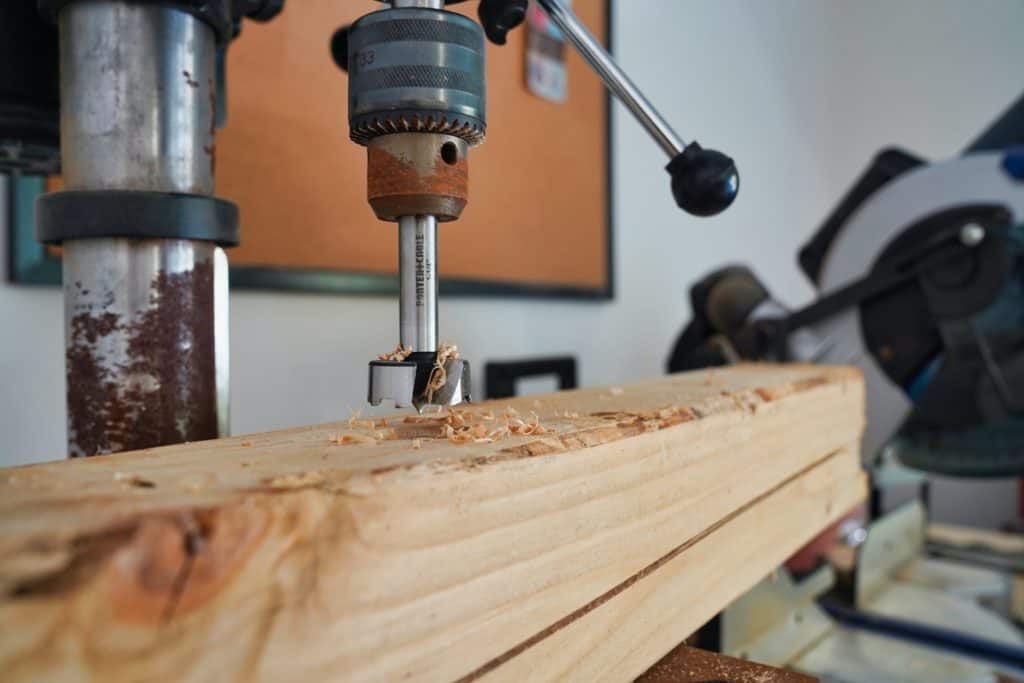
This is the perfect job for a drill press.
The go-to thing for anyone who is drilling a hole in anything should be to use the drill stand if the piece can be lifted.
However, as amazing as a drill stand is for drilling straight holes, they are limited in size; with only a small base, many people modify their drill stands to be on a larger table where they can place larger pieces to be drilled.
Try a Drill Guide.
The easiest and most useful tool you will find in any wood workshop is the guides they will have lying around. Usually created by using combinations of other tools, these guides ensure that when a hole is drilled, it goes perfectly straight; you can also buy these guides.
Some guides are at angles to ensure you drill straight holes, at an angle, some can have the same side at different intervals; either way, they are the best way to drill perfect holes using any bit.
The best and most popular example is the pocket hole jig. You can easily buy one on Amazon at this link (Link Here)
Make a Guide Hole.
Not needed when using smaller drill bits; guide holes are made using smaller drill bits. Small drill bits are easier to use than large ones, not dancing across the piece or going in skewed. A smaller hole that has already been made perfectly will guide larger drill bits into the workpiece.
What are the dangers of using the wrong drill bit?
Many things can happen when you use the wrong drill bit, the piece may crack as you drill into it, the bit may break, or the finished work may be the complete opposite of what you needed. Knowing what each drill bit does and how to use them properly will mean you are working smoother and much easier than you could ever have hoped for.
The biggest danger of using the wrong drill bit is breaking the piece or having the drill bit caught on the wood while it is in your hand. This can cause days of setbacks or massive injuries to you as you are working on the project.
It is always safer to use the right tool for the job instead of taking a chance and ending up with a project that looks nothing like you had planned.
Conclusion
There are several standard drill bits that every crafter needs in his garage or workshop. Knowing what each one does and replacing them as they get older will mean you are never left hanging. Having all the best and versatile drill bits will allow you and your projects always to be finished on time.
Just be sure you know exactly what you need to do and how to do it, maybe using a standard and then learning the rest from there!