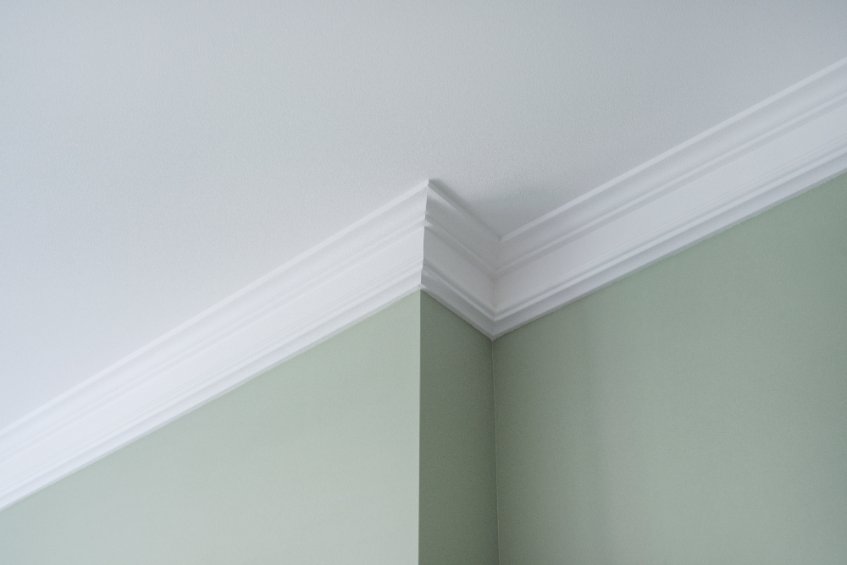
Looking to add some crown molding to your home? It can be quite a daunting task, especially if your rooms aren’t rectangular boxes or if you have vaulted ceilings.
To cut weird angles for crown molding, one needs to measure the angle for their corners and the angle for the peak of the molding (where the wall meets the ceiling) and then adjust their miter saw accordingly. In some cases, one may need a block or jig to adjust their saw properly.
If you want to know in detail how to get your crown molding job done right, then read on. This article will help you to get started and figure it out.
How to Cut Crown Molding
The first step in knowing how to cut weird angles for crown molding is knowing how to cut crown molding in general. If you don’t have the basics down, it’s going to be very difficult for you to try something funky with your molding. Luckily for you, the process for cutting crown molding at a weird angle is much the same as cutting it at any angle. The biggest difference is that you must measure very carefully and precisely in order to make your molding turn out as good as possible.
The tools you will need in order to cut the crown molding are as follows:
- Miter Saw/Angle Finder/Protractor
- Measuring Tape
- Blue Tape
- Mechanical Pencil
- Wood Block cut to be a right triangle (45, 45, and 90 degree angles)
After you have gathered your materials, you are ready to begin the process. Watch the video below for a guide on how to cut crown molding for beginners!
Cutting at Weird Angles
The first step to cutting crown molding (normal or weird) is measuring the angle that you want/need to cut. There are several different ways to measure the angles you need to cut your molding; however, I will list just a couple.
Note: One trick to do this is to cut out part of a pizza box so that two sides of it are flush with the two sides of the corner you are measuring (this may require some very careful trimming). This piece of the pizza box can then be used as a template for your miter saw, allowing you to ensure that both sides of the trim that you are cutting meet up properly. (Source)
The above trick is only really good if you have a relatively simple crown molding job and if you are comfortable being a little bit lost with your measurements. If you want to measure and cut your crown molding more accurately, one of the simplest ways to do it is as follows:
- First, you’re going to want to get near-perfect measurements. To do this, you’ll measure first the length needed for your crown molding from corner to corner. You can use a measuring tape to measure the length. If the distance is relatively long, then you may want to make a mark at an even point right on the measurement on the tape that is easy to remember, then continue measuring but do so from that point. Add the two measurements together (from where you made the mark to and the distant past that), and you are good to go!
- Next, you will need to measure the angle at which you will have to actually cut your crown molding. This is the tricky part. Use a protractor to measure the angle and record it so that you can properly set the miter saw for later. If the ceiling is not at a 90-degree angle, you may need to measure it and adjust the bevel on the back of your crown molding accordingly so it is flush with the wall. Always measure twice to make sure. As the saying goes; “Measure twice, cut once.”
- Make a line with your pencil on the molding in order to determine where you are going to cut it. Note that for each corner, you are going to have to make two identical but oppositely oriented cuts. You will need at least two pieces of molding for each corner. (Note: If the distance you are adding crown molding to is long enough that you will need more than one piece of crown molding for the middle section between corners, then make sure to never just cut the molding at a 90-degree angle and stick it together. It will look horrible and the gap will be very obvious.)
- When you go to cut your molding with a miter saw, it is good to mark out where the outside edge of your crown molding will go (the distance that end needs to be away from the saw guard). This can be done with a piece of blue painter’s tape and a sharpie. Remember, when you are cutting your crown molding, the top end will always go down, not up. The top and outside edge should be facing away from the saw guard and not towards it.
- Miter saws are the best tool for cutting weird angles in crown molding and will usually be able to cut your molding at virtually any angle. However, if that is not the case, there is an easy fix: simply take a 45-degree block of wood and put it flush with the guard, then lay your molding flush with it (you are essentially changing the angle of your guard with a block of wood, or extending it if you will). This will allow your miter saw to cut it just as if it were able to rotate to that angle normally.
- When you finally cut your crown molding, make sure to not cut directly on the line that you have marked out. Saw blades are typically an eighth of an inch thick, and cutting directly on the line can create unsightly gaps in your molding and will make the corners fit wonky. Also, make sure to cut very slowly. This is especially important if you are cutting a very steep angle in the wood. You wouldn’t want to split your molding or create an uneven cut!
- You will first need to cut the corner of one side of the first piece of crown molding you are using, and then the other. Remember that you will need to cut opposite sides of the molding if you are using identically shaped pieces. The long side of the molding (the side with the pointy corner) will be either on the top or bottom of the molding depending on whether you are cutting an inside corner or an outside corner. Always double-check and think about which end you are cutting first. You don’t want to waste any more molding than you have to.
- If you need to adjust the bevel of your crown molding due to an unusual angle where the wall meets the ceiling, you will need to measure the peak angle. You can use a crown pro jig to adjust the angle of your cut so that the corners of your molding still meet properly. This is essential if you have vaulted ceilings.
Watch the video below for additional advice and visual help on cutting a weird angle for your crown molding!