Building drawers is a difficult and technical task. To do it correctly there are some tools to purchase, as well as some experience you need so that you can do it right without injury or taking a long time to understand/complete it.
To build a drawer with dovetails, a person will need a dovetail jig, a template, a power tool for cutting, and other necessities. Put two pieces of wood in the jig and line everything up as the instructions state. Then the corners can be cut and lined up and will be ready for glue, screws, and more.
Wow, look at you! You are about to embark on this new project in which the garage will look and smell like sawdust for weeks. To help you figure out how to get started, read below.
Dovetail Drawers
Dovetails are how you can make drawer corners meet and interlock. Throughout history, furniture used this method to make drawers, but its design has changed over time. Now, it is called the dovetail, simply because it looks like a dovetail. In simple terms, you make dovetail drawers by cutting out the design and making the cutouts alternate on the two pieces of wood you are connecting.
After you cut the design and when you fit the wood pieces together, they should fit snugly. There are tools and more detailed steps to help you make sure you are doing it right, which we will talk more about later, but before starting on a project it is typically helpful if you understand the entire process so that you know what to do, why each step is important, and what tools you will need.
Gathering Supplies
You will need and want to gather tools and supplies for making these drawers. The easiest way to make Dovetail joints is by power tools, but if that doesn’t work for you then you can cut out the joints by hand. It will take longer to do, but it is cheaper if you don’t already have the tools necessary for the job. For more information on how to do this job without power tools, skip to the bottom of this article.
For those of you using power tools, make sure your roommates, spouse, and those you live with know that you will be making drawers, so there will be a lot of sawdust in or around your home, even if you do your best to keep your home clean. If you are worried about sawdust getting everywhere, hand plastic sheets around where you are cutting the wood and tape them together to create a seal.
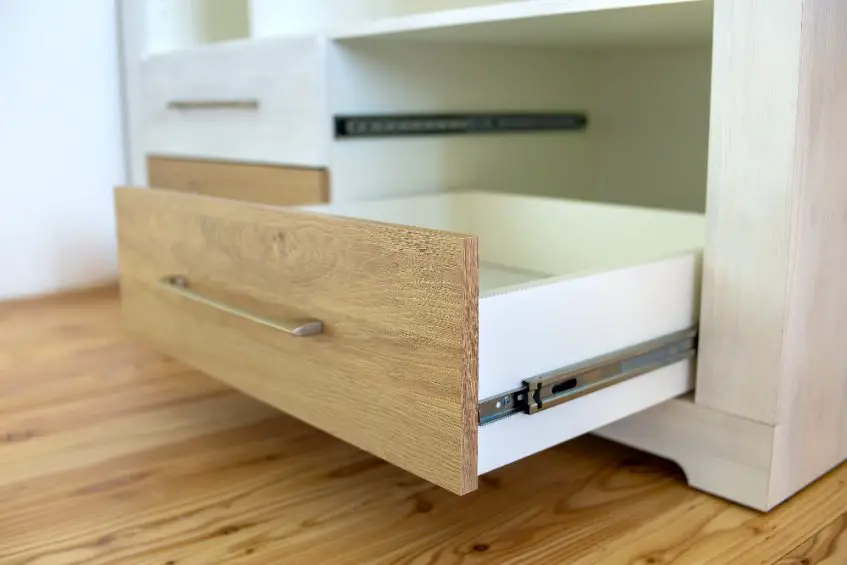
You will need a dovetail jig that will hold the pieces of wood together. You can find some that include templates for dovetail joints, and that would make hunting down products online a lot easier than getting them separately. You will also want a tool or attachment for shaving wood. You can also decide to use wood glue when joining the pieces together to make sure it stays together well, and you can decide to use other tools while working.
Watch the video below to get an idea of what you will need to do to make a dovetail joint. Make note of any other tools you may need that you don’t have.
After watching the video, you will want to create a list of supplies you will need before getting started. Do you have a way to get rid of sawdust? Do you have hand protection? Do you have eye protection? With all of that sawdust in the air, do you have some type of mask to cover your nose and mouth that will prevent you from breathing in sawdust? There are a lot of products that you should get for your safety and for the purposes of this project. After you make sure you have them, you are ready to begin making your dovetail drawers.
Setting Up
Setting up your project will set you up for success. If anything goes wrong and you can’t tell what you did that was wrong, chances are you will trace it back to the start of the project. So, set up your project carefully without skipping steps.
Make sure you have all your supplies out and start with making sure your wood pieces are cut correctly. Line up the pieces and see how they all fit together. Depending on if you are doing a half-blind or through dovetail you will need to plan what wood goes on the outside or inside differently.
When you buy a dovetail jig, there should be instructions on how to plan out the wood and cut it properly. There are plenty of videos and tutorials that have tips on this part of the project, so refer to those if you can’t quite figure the dovetail jig out.
You will want to set up your dovetail jig and get your wood set up in it. After you have that done correctly, you will want to draw on the dovetail or place the template on top of the wood and set it in place. The two pieces of wood would be off-center so that when you take them out and match them up, they will be even and fit together.
Then, you can move on to the next step.
Measuring
You will want to make sure your wood is measured correctly. You will also make sure that the corners that will interlock are drawn out correctly. You will measure the distance between the dovetails if you are hand drawing it and make sure you have it measured out right. Then, you will look at how the two pieces of wood will line up. See if you drew out the dovetails correctly and fix any mistakes before cutting.
This is one project that you don’t want to mess up on because you need the precise measurements to get it done. Plus, with how expensive wood and lumber are, you will not want to go back to the store and buy more wood to cut properly and get the right type of wood for the project to help you avoid spending money that you don’t need to spend.
Cutting
Next, you can get onto cutting the wood. Make sure you have your wood all lined up and set in place so that it won’t budge. If that is incorrect, you will likely be injured, and we want to avoid that. So, before cutting, double-check everything and make sure you are safe and your project is set up properly. Then, get to cutting.
If you are using a template, set up the template and simply go along the sides of it while cutting. Follow the template, go slow and steady, and make sure your eye protection is on. There will be a lot of sawdust, so watch out for that. When you finish cutting, turn off the tool and take the wood out. Now, test out the pieces and see how they fit.
Fitting
After taking the wood out of the jig, carefully fit the pieces together. If you set everything up and cut it correctly, then you will find that the wood pieces fit perfectly. When you have finished cutting all of the pieces, build the drawer and make sure all of the pieces fit properly.
Then, use your preferred method to ensure the drawers stay together. One method is to use some wood glue and fit the pieces together, then wipe away the excess glue. Leave the drawers for the recommended time that the wood glue bottle says or simply leave it overnight.
After leaving the drawers overnight to ensure the wood glue is fully dried, then you can carry on with the rest of your project. Maybe you want to sand the corners to be a little more flush, or you want to screw on the drawer face, or you want to add the railing and wheels to the drawers, etc.
Whatever you need to do to finish building the drawers, go ahead and move on to that step. Your drawers are built to be strong and withstanding, so once you finish the project, put the drawers to the test and marvel at your finished product. Congratulations! You made drawers! Now you can clean up the sawdust and enjoy the fruits of your labor.
How to Make Dovetail Joints by Hand
To make dovetail joints, you will need a marking pencil, a handheld dovetail saw a dovetail marker, and protection gear. If you have your wood pieces cut to size, all you need to do is lay out which piece is going where and label the different pieces of wood. Whatever method you use to mark will work, you could even have each piece labeled A, B, C, etc. Then, on the sides where the piece will connect, write AB to indicate that is where the piece you are holding (A) and the piece on the floor (B) will connect on those specific sides.
After marking the wood, use the dovetail marker and mark/outline the groves that you will cut out. Plan this out with the piece you will connect to it and alternate which pieces you will cut out. For example, label the dovetail outlines as 1, 2, 1, 2, 1, 2, etc. Then, you will cross out the 1’s, meaning that on that piece of wood you will cut out that part of the wood.
Next, you will line up the piece of wood that will connect to it and mark the dovetails on it, then cross out all of the 2’s. That way, the joints are alternating and when you have finished cutting, the pieces will fit together. There are some more details on how to draw the markings on the wood so that when you cut it out, it will be cut correctly. Watch the video below for a visual of these instructions and follow along to make sure you do it right.
In this video, the man uses two different size chisels to shave and smooth down the rough edges from cutting the dovetails. In the end, he also uses a rubber mallet to gently hammer the joints together. They use the method of cutting out the pattern on one piece of wood and using that as a template for the other wood, which works great too. This is simple and easy, and the only real downside is that it takes a while to complete the project when you do it all by hand. But, it is not impossible to be careful, stay safe, and get going on your project.
One positive about making dovetails by hand is you can avoid the sawdust mess that power tools make on this project. The video is very good at showing you how to be careful and get as much out of the spaces as you can with the saw, and then he uses the chisel to shave and smooth out the space and make it more precise. This is very attainable for people with less experience to accomplish, but the number one thing to remember is safety.
You can easily cut yourself doing this project by hand, so make sure that you know how to be safe and you try to direct your blades away from you as much as possible. It might be harder if you are cutting downward and your legs are feet are below the wood that you’re cutting, but in any case, take note of where your body is, where your feet are, where your chest is, and more. You should also watch out for your fingers and arms. While trying to use and direct the handheld saw you can easily give yourself a shallow or pretty deep cut on your fingers, hands, or arms.
Be cautious and intentional with cutting. Injuries occur when your brain is on auto-pilot and you are carrying out the actions without much thought. But, if you stay focused and are intentional with the cuts you make on the wood, you can minimize injuries and potentially avoid them altogether.